Summary
This Desk Reference covers:
Gathering Information before placing an Order
Order > Add Customer Tab
Serviceability Page
Contacts Page
Packages Page
Review Page
Confirmation Page
Additional Steps to Confirm the Order
This Desk Reference supports the Authorized Reseller audience.
Follow these steps to determine whether the beam is open for sales and confirm that ViaSat-1 is the satellite.
Log into the Support Portal with your Reseller ID and password.
Go to the Tools tab.
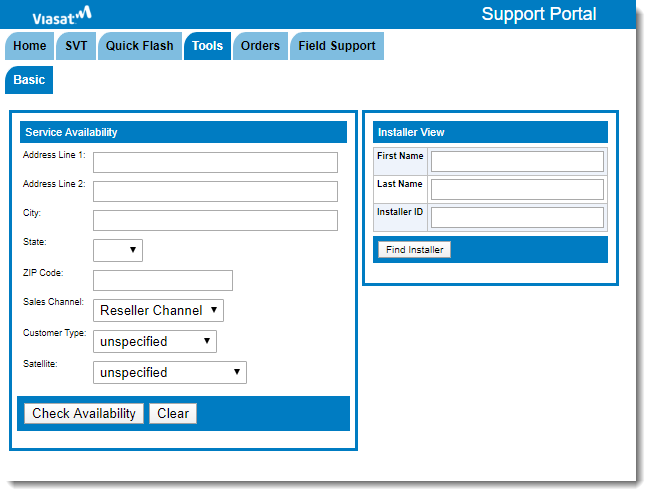
Using the full, USPS-approved street address for the service location, complete this form. This must include the Zip code, and preferably, Zip+4. Leave the Satellite field as ‘unspecified’. Click Check Availability.
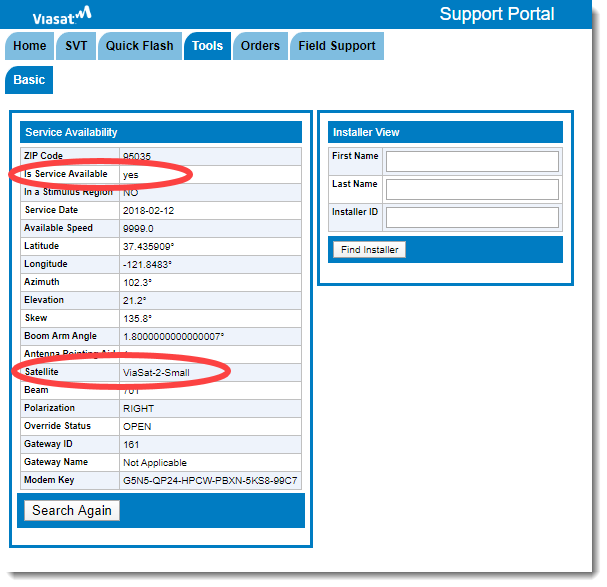
The results appear. Check the line ‘Is Service Available’. The answer must be ‘yes’.
It is also helpful to note the satellite, as this will help a reseller understand the plans that will be available.
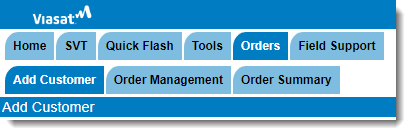
Order > Add Customer Tab
Now the Reseller is ready to enter the order for Viasat Internet. Go to the Support Portal, and click the Orders tab. Follow these steps to enter a New Connect order. The process involves completing five (5) forms, using information gathered from Service Availability, The Plan Selector Tool, and the Customer.
Tip! It is best to have the Customer available, when entering the order for two reasons:
- they can confirm the address information
- they can provide payment information directly, without the dealer writing it down.
Writing down payment information, and then disposing of the information incorrectly, may be a PCI/DSS compliance violation.
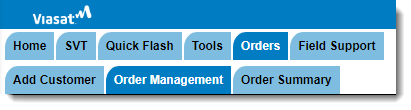
After logging into the Dealer Support Portal with your Self-Installing Dealer ID and password, click the Orders tab, and confirm that the Add Customer tab is highlighted (dark blue)
The Progress bar shows the Serviceability page highlighted (light blue). The Progress bar may be used to return to a previous page, but it does not allow the dealer to jump forward in the Order Entry process.

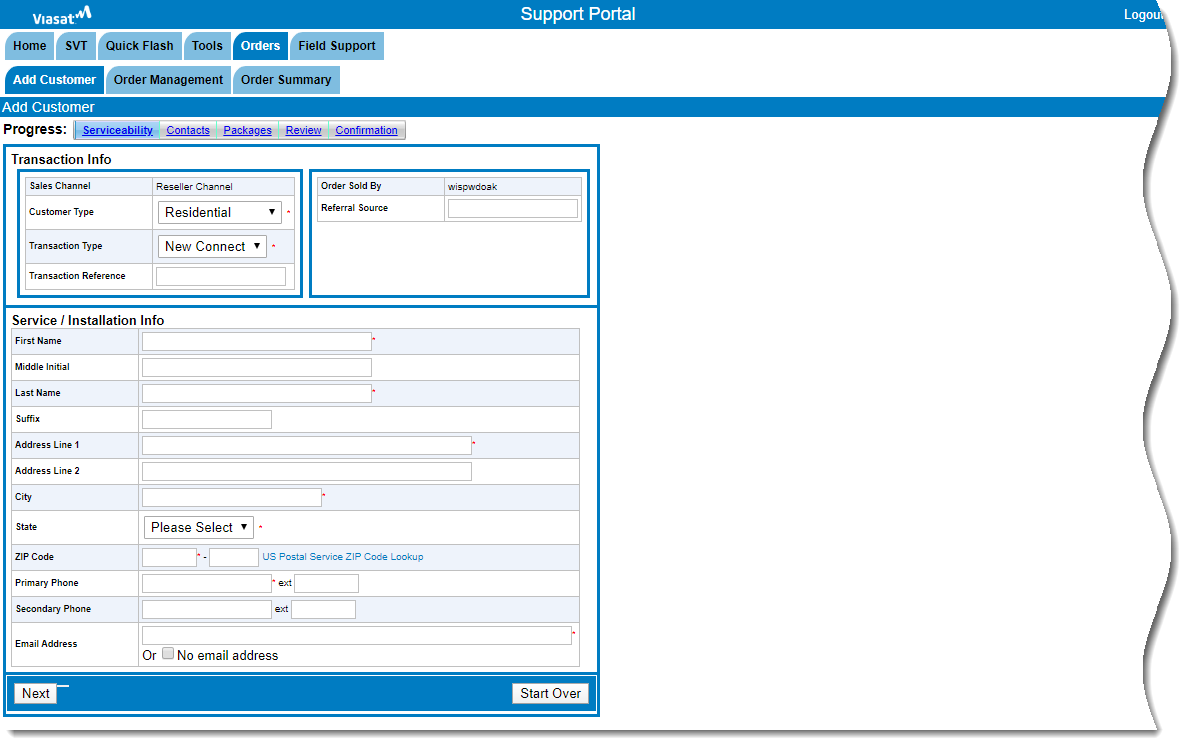
Serviceability Page
In the Transaction Info box, do the following:
- In the Customer Type box, select Residential
- Confirm the Transaction type is New Connect.
- Add a Referral Source, if necessary
See image below.
In the Service/Installation Info box, do the following:
- Type the Customer’s First, Middle Initial, Last Names, and Suffix (if required)
-
Type the Customer’s USPS-standardized street address of the location where the service will be installed.
- Do not use a P.O. box.
- Do not use an address that is made-up, ‘close enough’ etc.
- Type the Customer’s City, State, Zip+4, primary and secondary (if desired) phone numbers.
-
Type the email address the Customer wants as his/her contact email.
- This must be an existing email address.
- Click Next to move the order forward; click Start Over to clear the forms.
Note: Required fields have a small red asterisk to the right of the field box.
See image below.
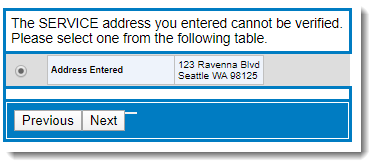
The address is verified as a USPS standardized address.
- If minor changes are needed to standardize the address, the system automatically makes these changes. For example: 555 Ravenna Blvd, 98125, might be changed to 555 NE Ravenna Blvd, 98125-6427.
-
If the address is not recognized, the system presents a page with alternative addresses. If alternatives are not presented, then verify the address using the US Postal Service Zip Code Lookup link. This link opens the USPS Zip Code web site, where the dealer and Customer may work on the address to arrive at the standardized address.
- If the USPS Zip Code web site is unable to locate the Customer’s correct address, it is very unlikely that the Customer’s site may receive Viasat service. The order should not be entered.
See image below.
Contacts Page
The Progress bar shows the Contacts Page highlighted.

In the Service/Installation Info box, confirm that all information is correct.
See images below.
In the Billing Info box, do the following, if necessary:
- Remove the checkmark from the box Same as Service/Installation Info and click the blue arrow.
- Make any necessary changes to the Billing Info fields, for example, if their bank account has a P.O. Box for the monthly statement. These fields are optional.
See images below.
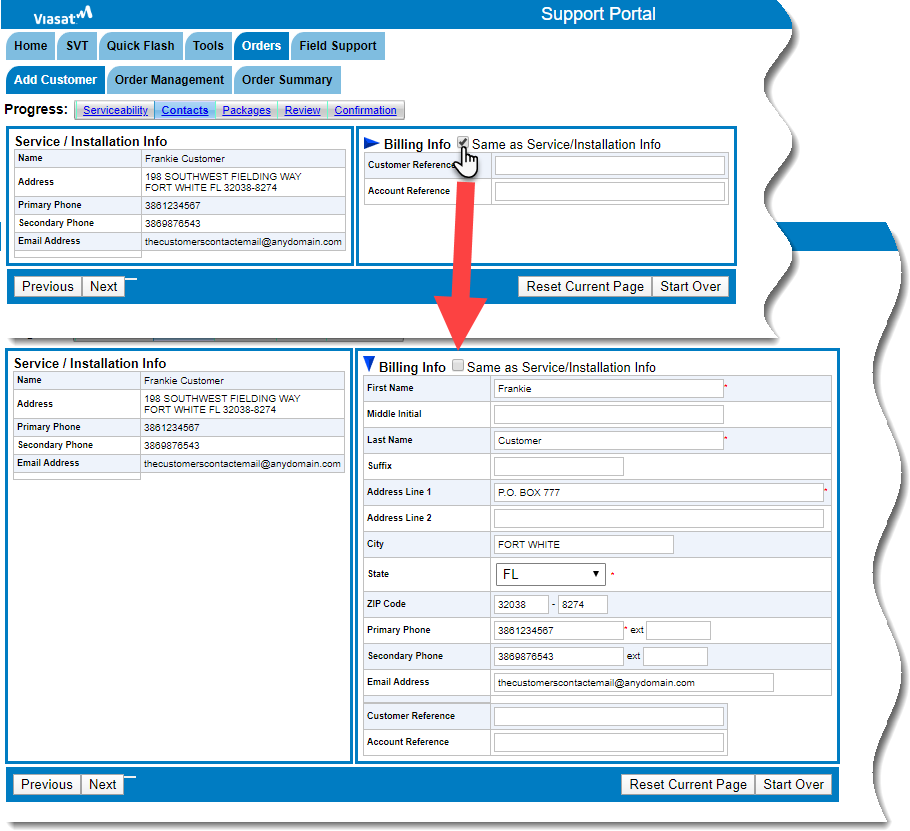
Click Next to move the order forward; click Previous to return to the Serviceability Page. Click Reset Current Page to remove any change made to the Contacts Page; click Start Over to clear all forms.
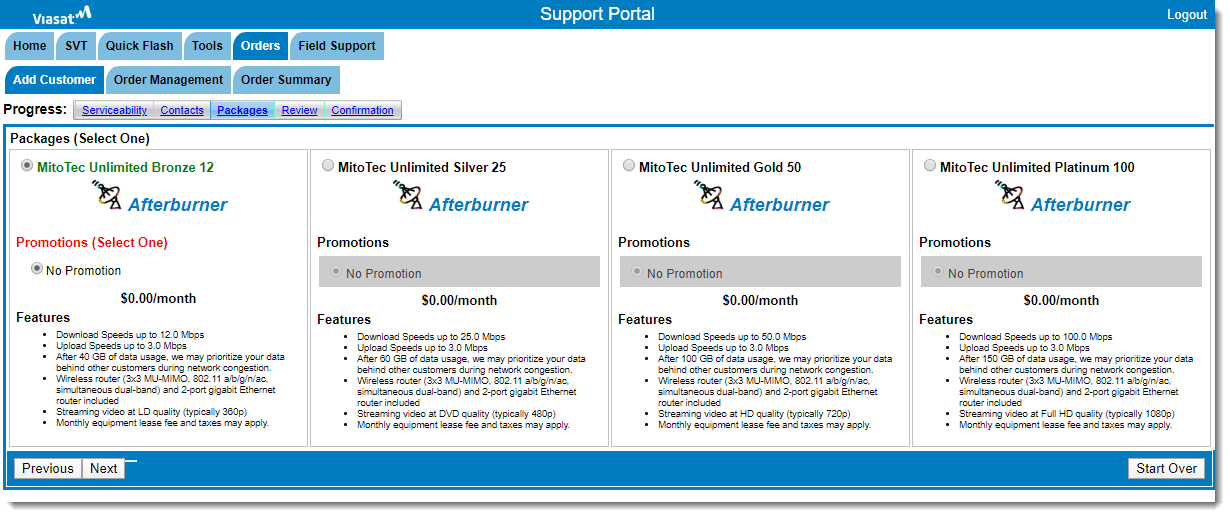
Packages Page

The Progress bar now shows the Packages Page highlighted.
Using the information gathered during the sales process, combined with the results of the Plan Selector Tool, select the desired package/plan.
- Click the radio button next to the package title.
- Click the radio button next to the desired promotion.
- Review the features, price, and disclaimers with the Customer.
Note: Resellers will see all packages available in the beams they support; however, they may elect to market/sell specific packages.
See image below.
Click Next to move the order forward; click Previous to return to the Contacts Page. Click Start Over to clear all forms.
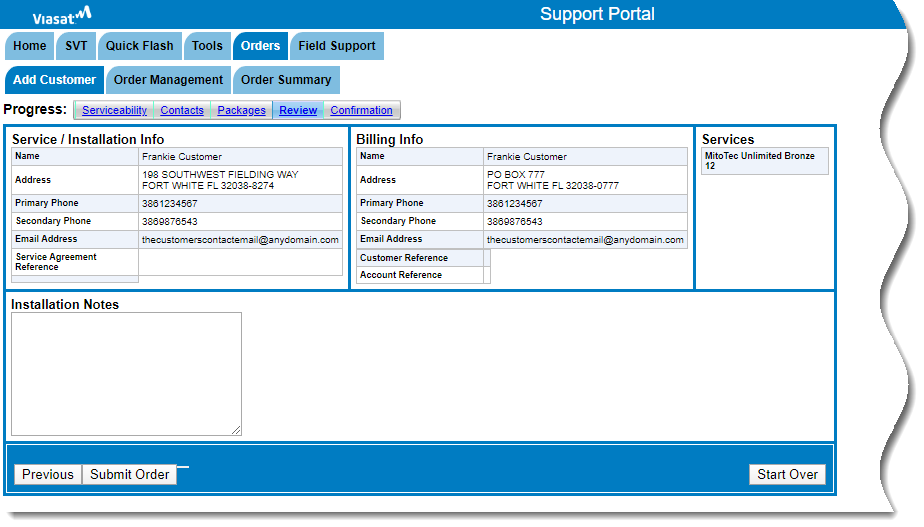
Review Page

The Progress bar shows the Review Page highlighted.
For each section of the Review Page, confirm with the Customer that the collected information is correct.
- If there are errors, use the Progress bar to return to the appropriate page to make the corrections.
See image below.
When all sections are confirmed as correct, click Submit Order. Click Previous to return to the Payment Page; click Start Over to clear all forms.
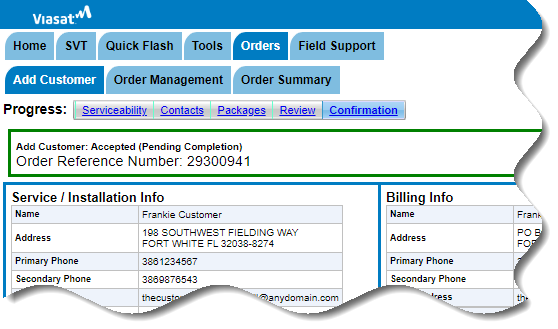
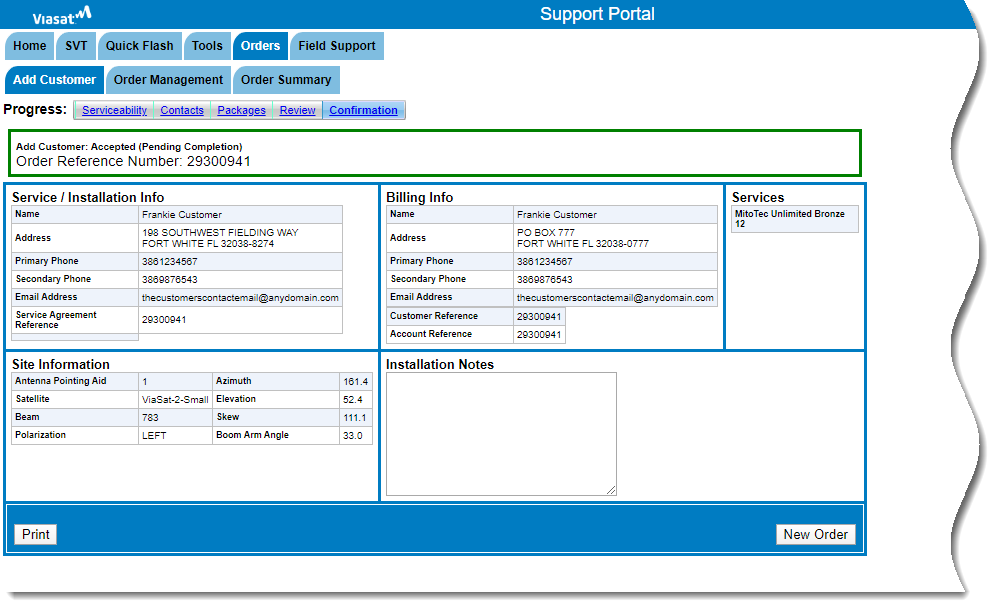
Confirmation Page
The Progress bar shows the Confirmation Page highlighted.

If the order is successful, a green border appears between the Progress bar and the sections of the order. Look for the phrase Add Customer: Accepted (Pending Completion).
If the order has failed, a red border appears around the error message, and the Progress bar returns to the Review Page.
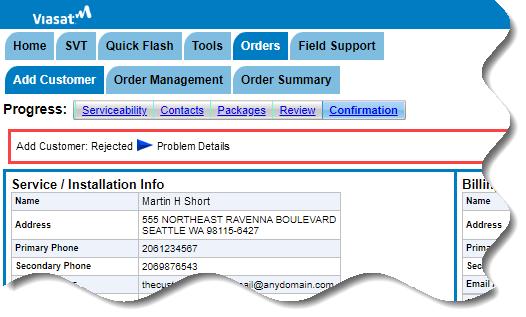
Click the blue arrow to expand the details and read the Problem Details. Occasionally an error appears, but the order does complete. When an error appears, follow these steps to determine the right course of action:
- Go to section Additional Steps to Confirm the Order, below, and confirm that the order did not go through. This step is necessary, as simply reentering the order would create duplicate orders.
- If the order did not go through, then log out of the Support Portal, and close the browser.
- If possible, reopen the browser and clear the browser’s cache and cookies.
- Wait 15-30 minutes and repeat the Order process.
- If the order still fails, contact your distributor, or other escalation contact. 720-493-7300 or DEN-SA-CTR@viasat.com
If desired, click Print to print a paper copy of the Confirmation Page.
Click New Order to return to the Serviceability page and enter the next order.
Additional Steps to Confirm the Order
As a best practice, Viasat strongly recommends that the reseller confirm that the order has been fully completed in the Support Portal. The Order Management sub-tab (next to the Add Customer sub-tab) may be used for this purpose. These steps may also be used in when an error appears on the Confirmation page.
After the Confirmation appears with a green border, which states that the order was accepted, return to the Home page of the Dealer Portal.
Type the Customer’s phone number in the Customer Search field and click Search.
See images below.
From the Search Results list, click the link in the WildBlue Account # column. This loads the Customer into the Support Portal context. All tabs in the Support Portal now show information about this specific account.
See images below.
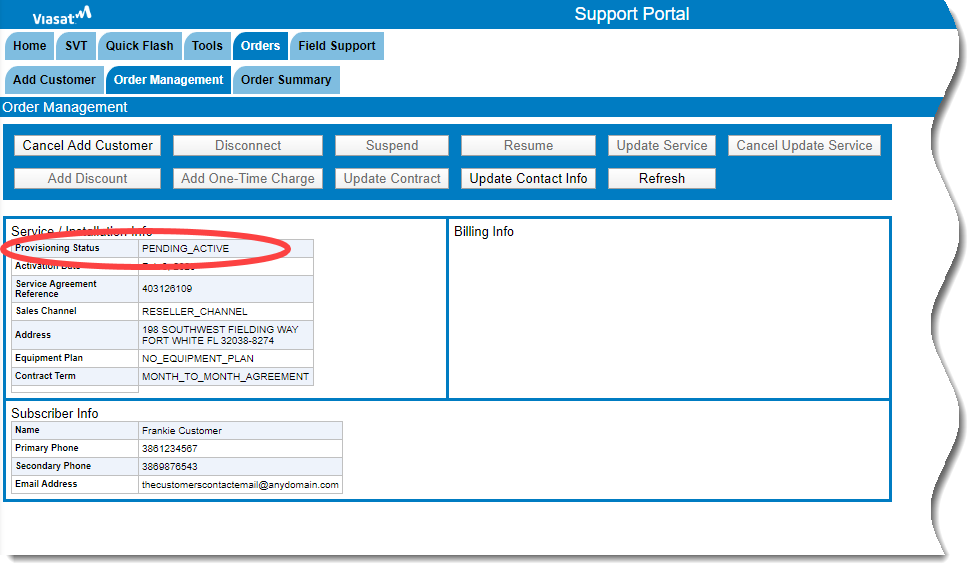
Click the Orders tab, and then click Order Management. The Order Management sub-tab is now dark blue.
If the Provisioning status reads Pending Active, then the order has completed. The order is ready for installation.